Overwintering canna Plants
Eventually in every season will come the time for overwintering canna plants. Canna plants are not frost hardy although their root system or rhizomes will survive a frost if they are well protected. The first frost of the season is rarely severe and the foliage above ground will give sufficient protection to the roots. Once the foliage has turned to mush it needs to be removed by cutting them stems down and the foliage added to your compost bin. I like to leave a reasonable bit of stem sticking out of the ground so that I can easily locate the rhizomes at a later date.
Once the foliage has been removed, the rhizomes become more vulnerable. A thick (4 inch) layer of mulch needs to be applied over the rhizomes. The mulch can be anything organic such as your own compost, manure or composted bark for example. The mulch needs to be organic so that it can be incorporated into the soil. In other words don't use a gravel mulch.
Occasionally I have lost plants by failing to mulch. Somewinters are quite mild these days and I have got away with out mulching. The winter of 2005/2006 It was not especially cold but it was quite cold for most of the winter. As a result when I came to dig up the first batch of rhizomes I could not get the fork in the soil. When I did manage to dig up the plants, many were beyond help.
It is possible to successfully leave canna plants in the ground permanently. Providing you give the plants a thick mulch. However this practice is not advisable in areas that receive regular and severe frosts. I shall talk about leaving canna plants permanently in the ground at the end of this section.
Lifting canna rhizomes
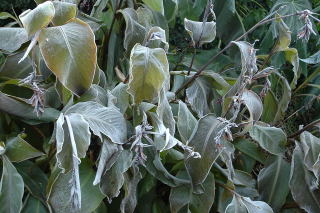
If you live in an area prone to severe frosts it is advisable to lift (dig up) your canna rhizomes as soon as possible. Then store them in a frost free area. If you are unable to do this right away then a layer of mulch is necessary in the mean time. Don't worry about wasting mulch as it will just get incorporated into the soil and improve it.
The glory days are over for these frost damaged canna
go
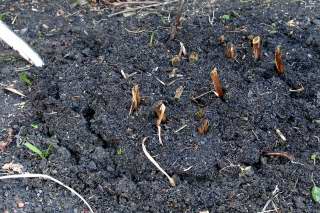
So whether you lift your rhizomes immediately or in February, the next step in overwintering canna plants is the same. Locate your plants by finding the old stems. Dig around the rhizomes with a fork. Slide a fork under the rhizomes and lever them upwards. Do this in a circular fashion all the way round your clump of rhizomes. You may find that you puncture the odd rhizome with your fork. There may be some creaking sounds as the rhizomes split. Don't worry too much about this as canna are pretty resilient plants. You will probably be surprised by just how much rhizome you have compared with what you planted in the first place.
Lifting canna rhizomesgo
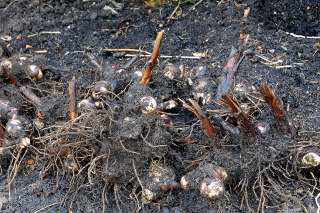
Once you have dug your canna rhizomes you will be presented with a pile of muddy, rooty rhizomes. (There are several plants in this pile in case you were wondering.)
Canna rhizomes awaiting a good wash
go
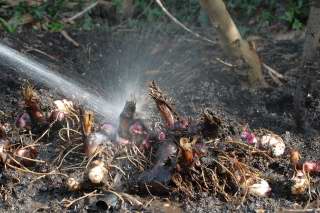
The next phase in overwintering canna plants is to hose them down and remove all the soil. Some literature will state that you can simply pot up the rhizomes as they are. Although it is possible to do this, I prefer to remove all the soil. You don't know what beasties may be lurking within the soil. The last thing you want to do is introduce slugs into your greenhouse. Also by washing all the soil off the rhizomes, it is easier to see and therefore trim any damaged sections of rhizome.
Tra la la la la
go
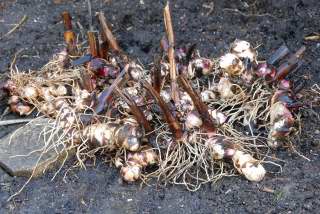
This is a fairly messy job so it is advisable not to be wearing white clothes. Choose a sunny day as the chances of getting splashed are high and tap water in February is cold. When you have finished you will have a pile of clean, rooty rhizomes.
Washed canna rhizomes
go
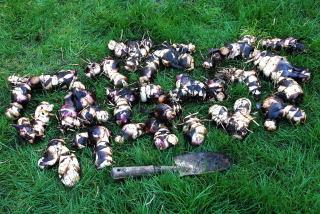
That particular untidy rabble can be trimmed and divided into the following tidy rabble.
Trimmed and divided canna rhizomes
go
Using a pair of kitchen scissors cut off all the roots. Then trim the remaining stems with a pair of secateurs. Any particularly large clumps are best divided for ease of potting up. This can be done with a sharp knife. Alternatively the rhizomes seem to have natural fracture lines. If you hold two opposing ends of a clump and gently bend, they usually split cleanly from each other. When you come to pot up your canna rhizomes, no harm will come if you need to trim the length of the rhizome to fit it into the pot. The particular rhizomes featured in these pictures are from Canna Indica Purpurea. The are quite large and involve more frequent division than many of the hybrid varieties.
Do not unnecessarily divide rhizomes. Generally the larger the clump, the larger the plant.
In this example, the blackened part to the left of the stem is last years rhizome. Cut this bit off as well as the stem and roots. Like so...
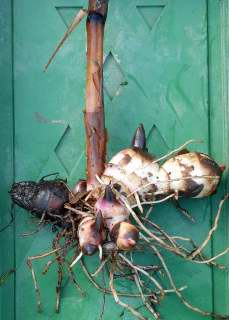
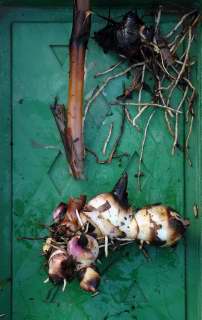
Canna rhizome awaiting surgery. Canna rhizome in recovery
The rhizome is ready to be potted up. If you have done this in early winter just after the first frost, it is possible to store all your cleaned and trimmed rhizomes in a very large pot with something like damp, ground and composted bark. Multi purpose compost will do but is more likely to dry out. These can be ignored in a frost free shed or garage until February. It is important not to store them in your house as they will begin to grow if kept anywhere warm.
So the next stage in overwintering canna plants is to get them back into growth.
Growing on canna rhizomes
There are two basic methods to restart your canna plants.
1. Pot up the rhizomes, individually or several to a pot, in some form of multi-purpose compost. Water them in and let nature take its course. When the canna feel ready they will begin to grow. This will happen fairly soon if you are starting them off indoors. In a frost free greenhouse, when they start growing will depend a lot on the general weather conditions. They should get going some time in March.
2. Force them. This involves exactly the same initial process as above. Fill a pot half full with some form of multi purpose compost. Place your rhizome horizontally on the compost and then cover the rhizome with more compost. Water the pots and allow them to drain. Cover the pots with cling film. Then rather than just letting them get on with it, the pots are placed either in a heated propagator, or my preference - heated mats.
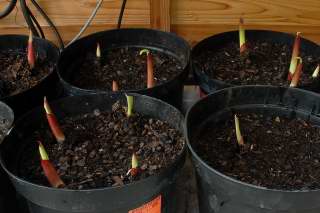
What are the advantages of using heat. The main one is it allows you more control over the plants. If you have a garden full of Canna, gingers, dahlias or what ever you need to get going in spring, the use of heat mats allows a bit more of a production line to be set up. Once a canna pot is placed on a heat mat it is just a question of days before new shots are poking through the surface. For example in this shot:
Emmerging canna shoots
go
Thanks to the miracle of the micro chip I can tell you that this picture was taken on 12th March and my camera tells me these plants were placed on the heat mat on the 2nd March. Once the plants are growing they can be taken off the mats to make way for the next wave. Now all that is needed is a vigilant eye for aphids and the odd wayward slug. (And water of course)
Overwintering canna plants in the ground
If you live in an area where frost is only an occasional problem, overwintering canna in the ground can be successfully achieved. However plants will need, as mentioned earlier a good thick mulch. Overwintering canna in the ground can have its draw backs. The plants may not be in the ideal position when it comes to your next planting plan. If the winter was long and drawn out, followed by a miserable spring, the soil in your garden will not warm up for some time. As a result your canna plants may not start poking out of the ground until quite late in the season. If you have chosen a variety because of its flowers, chances are you may not see these flowers until as late as August!
Some would say that overwintering canna in the ground prevents you from enriching the soil. Others would say that not disturbing the soil, and applying a surface mulch, is a better way to enrich the soil. So it depends which camp you are in. Neither argument has disproved the other so I would not worry too much about all that.
As far as soil temperature is concerned.... You can borrow a technique used by the growers of vegetables. It involves covering the ground where your canna are resting with a heavy duty sheet of clear plastic. The idea behind this is to use the sun to heat the soil up. Clear plastic is better than black. Also black is not much use once the plants emerge.
If you do decide to leave your canna in the ground, mulch heavily with home made compost and composted manure. The idea being that soil borne creatures such as worms will pull the nutrients into the soil for your plants to use in the following season.
In the spring, secure clear plastic sheeting over the soil where the canna rhizomes are dozing. A lot will depend on the sort of spring you are experiencing. A cold and cloudy spring will have a much slower affect on the soil temperature than a dry and sunny one.
Eventually the new shoots will begin to break the surface. This of course leaves them vulnerable to attack from both frosts and any recently awakened slugs. It is important to keep an eye on the weather forecasts with this method and keep some horticultural fleece handy just in case.
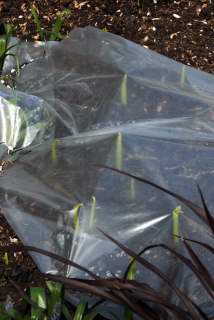
The slugs will find the tightly wound leaves an irresistible temptation. You will probably have to grin and bear the slug damage at this stage as access to the plants under plastic may be difficult. Although the damage may seem severe, the first leaves to emerge remain lowest on the stem and as such are soon disguised as the plants get larger. Once the plants are larger and the plastic sheeting is off, you can exact your sweet revenge.
Canna shoots emerging under plastic
go
You may find, when growing canna this way, despite a slower start, the plants left in the ground soon overtake the plants that have been lifted and started in the greenhouse. This assumes that they have not been walloped by a late frost. The plants are also bigger and show better conditioning. Plants with a dark foliage such as Canna indica purpurea have a much darker and purple leaf. They also lack a lot of the speckling exhibited by the lifted plants. However every now and then even these plants will have to lifted and thinned out as they will become congested.

